Additional material for lesson 6
Serial terminal emulator software
Both the standard Arduino IDE, and Visual studio code (with PlatformIO) has built in serial terminal emulators. If however you require more advanced features, different software might be more appropriate.
Minicom is a popular GNU/Linux serial terminal. Refer to the manual for your distribution for instructions on how to install it.
PuTTY is a popular alternative for Windows. You may download it at putty.org.
Store the strings in program memory
By default the strings you use in your writes to the serial port are stored in RAM. The SRAM in Atmega328P is only 2 kB. If you have lots of text that you wish to send to the serial port, this can quickly consume all of your memory.
To overcome this issue you may store the strings in program memory. There are however some implications to consider.
This fact may seem a bit confusing to anyone that is new to microcontrollers. After all the SRAM is volatile, all it’s content is deleted when you reset or power off the microcontroller. Then how can the strings survive the power cycle? The explanation for this is that the strings are stored in program memory, and copied into SRAM during the boot process of the controller. In other words they occupy the same amount of memory in both SRAM, and flash ROM.
This is required because the CPU instruction to read RAM differ from the function (LPM) that read the flash ROM. Any function that supports normal variables will fail to access data from ROM.
You may read more about the various memories in Arduino here
In order to tell the compiler to store data in program memory you may use the PROGMEM modifier:
const PROGMEM uint16_t testData[] = { 65535, 32000, 12000, 20, 12345};
The following example illustrates how to store and retrieve some numbers, and one string from program memory:
#include <Arduino.h>
#include <avr/pgmspace.h>

const PROGMEM uint16_t testData[] = { 65535, 32000, 12000, 20, 12345};

const char testString[] PROGMEM = {"This string is stored in program memory."};

void setup() {
  Serial.begin(9600);

  uint16_t progmemInt;
  uint8_t progmemChar;

  for (uint8_t i = 0; i < 5; i++) {
    progmemInt = pgm_read_word_near(testData + i);
    Serial.println(progmemInt);
  }

  for (uint8_t i = 0; i < strlen_P(testString); i++) {
    progmemChar = pgm_read_byte_near(testString + i);
    Serial.write(progmemChar);
  }
  Serial.print('\n');
}

void loop() {

}
If all you need is to write a string to the serial port, and you don’t want to waste memory the F() macro may be used:
Serial.print(F("This string is constant, thus it is best to store it in FLASH"));
You may read more about how to use the program memory to store data in the Arduino reference
Simple command line interface
In order to interact with the software in the Arduino while it is running, we will create a simple command line interface.
#include <Arduino.h>

void setup() {
  Serial.begin(9600);

  Serial.print("# ");
}

uint8_t command = 0;

void loop() {

  if(Serial.available()){
    command = Serial.read();

    if(command == 'A'){
      Serial.println("Kommandoen er A.");
    }
    else if(command == 'B'){
      Serial.println("Kommandoen er B.");
    }
    else{
      Serial.println("Ugyldig kommando.");
    }

    Serial.print("# ");
  }
}
Arduino serial port buffer
The Arduio uno has circular RX and TX buffers of 64 bytes. If the buffer is full, incoming data is discarded.
#define SERIAL_TX_BUFFER_SIZE 64
#define SERIAL_RX_BUFFER_SIZE 64
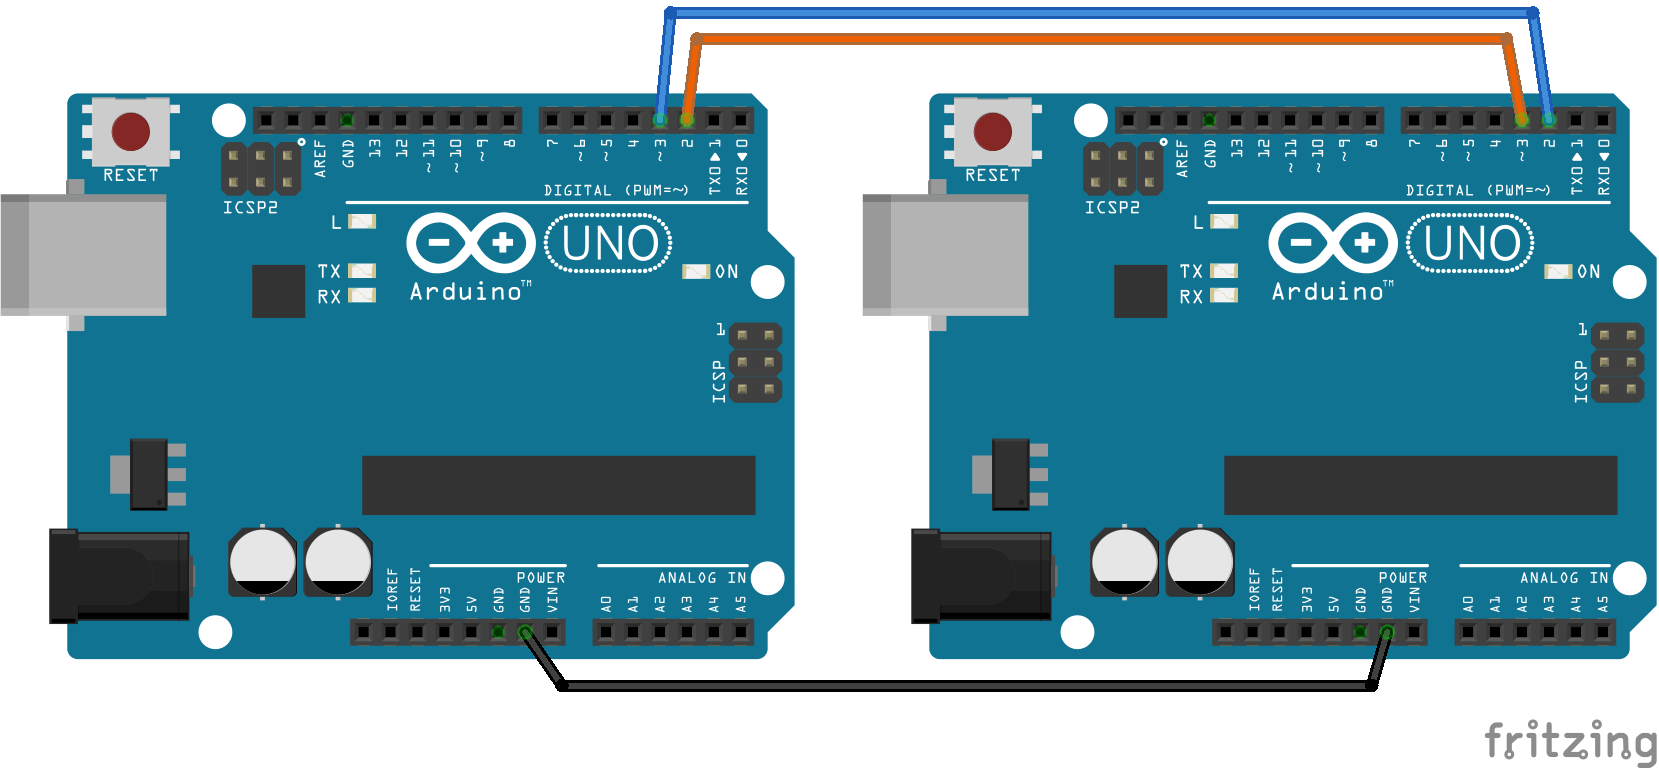
Connecting two Arduino’s using UART
The following example shows how to communicate between two Ardiuno UNO’s using the UART. On each device pin 2 is used for reception (RX), and pin 3 is used for transmission (TX). The TX output of one device is connected to the RX input of the other.
/*
 * This program allows two Arduino Uno's to communicate with each other via UART.
 * Because the Atmega 328 only contains a single hardware UART, we are using a software
 * UART library.
 *
 * The USB is using the hardware UART for program upload, and general communication with a PC.
 * The data that is sent on the USB UART will be retransmitted on the software UART, and any
 * data received by the software UART will be retransmitted on the USB UART.
 *
 */

#include <Arduino.h>
#include <SoftwareSerial.h>

/*
 * Add compile date and time, used for a unique identifier.
 * This is useful when working with multiple Arduino's
 * in order to not confuse yourself regarding which device
 * you are currently dealing with.
 */
const String compile_date = __DATE__ " " __TIME__;

const String user_name = "Ditt navn";

SoftwareSerial softSerial(2, 3); // RX, TX

void setup() {
  Serial.begin(9600);
  softSerial.begin(9600);

  Serial.println("Arduino UART kommunikasjonslink");
  Serial.println("Bruker: " + user_name);
  Serial.println("Komplieringstid: " + compile_date);
}

void loop() {


  if(Serial.available()){
    softSerial.write(Serial.read());
  }

  if(softSerial.available()){
    Serial.write(softSerial.read());
  }

}
Conditionals
Conditionals are used in order to carry out some actions under some circumstances. In other words, you use conditionals if you want to do things in some conditions and do some other things for some other conditions.
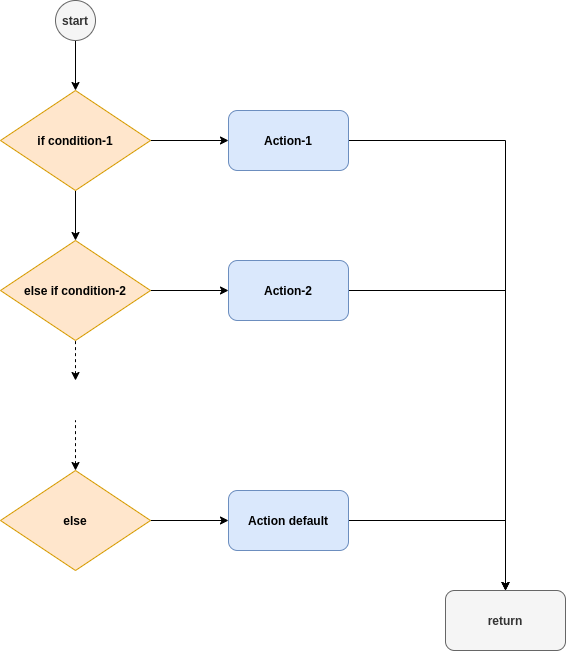
Let’s do a bit of brain storming before implementing the conditionals: You want to turn on an LED if your system stays stays vertical. If your sytem is tilted, then you want to turn off the LED. Can you help me to draw the flow chart?
Practical example: Tilt Sensor (if..else)
In some cases, having too many if…else statements one another looks unpleasant. A more compact looking of your code is mode fruitful. Then, switch..case concept enters the game.
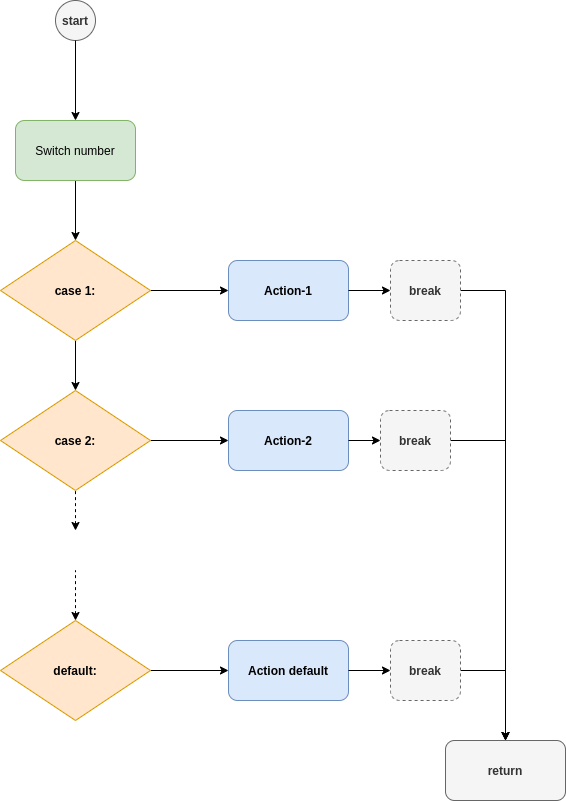
Let’s do a bit more brain storming for switch..case: You want to make a program that asks to the user what s/he wants to do with an LED. If the user presses 1, turn on an LED. If they press 2, turn off LED. Also, in case they forget which number was on/off; if they press 3, there will be a help section. Can you help me to draw the flow chart?
Practical example: Switch-case example
See also
Do you know how a beautiful if…else look like? Check this out Simple touch to If…Else.